
Key takeaways
- Warranty Description: 2 Year Manufacturer
- Tension Supported: 1000 pounds
- Handle Type: Fixed Handle
The decision between a full cage and a half rack almost never comes down to lifting preference. It comes down to a tape measure. Stand in the corner of your garage where the rack will live, measure the ceiling at its lowest point — including the garage door track and any joists that dip below the drywall — and then measure the floor from the wall out. If you have less than 88 inches of vertical clearance, a full-height cage with a pull-up bar becomes decoration. If your usable depth is under five feet, a four-post cage will eat the walking path you need to load plates.
Here is the practical split. A full power cage gives you four uprights, two pairs of J-cups or hooks, and safeties that catch a failed squat from both sides — you climb inside it and lift. A half rack gives you two uprights (sometimes with a short rear base for stability), and you lift in front of it with spotter arms cantilevered forward. The cage is safer for solo max attempts. The half rack is lighter, cheaper, less claustrophobic in low ceilings, and lets you press a barbell overhead without threading it between posts. Both are legitimate. What follows is how to pick, plus a look at the CAP Barbell rack line, which is where most first-time garage gym builders start because the entry price is genuinely low.
Our top picks
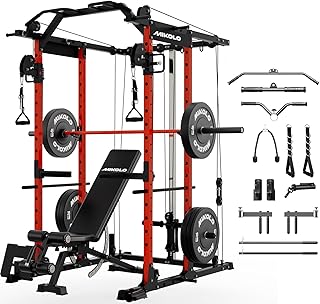
 ULTRA FUEGO Power Cage
- Warranty Description: 2 Year Manufacturer
- Tension Supported: 1000 pounds
- Handle Type: Fixed Handle

 DP01 Power Cage
- Warranty Description: 2 year
- Tension Supported: 2000 pounds
- Grip Size: Standard



As an Amazon Associate we earn from qualifying purchases at no extra cost to you.
Quick Comparison
| Format | Typical Footprint | Ceiling Needed | Solo Safety | Best For |
|---|---|---|---|---|
| Full power cage (4-post) | ~48″ wide × 48–60″ deep | 84–90″+ | Excellent — safeties on both sides of the bar | Heavy solo squatting and benching; pull-up bar included |
| Half rack (2-post + base) | ~48″ wide × 24–36″ deep | 80–86″ | Good — depends on spotter arm quality | Low ceilings, overhead pressing, tight garages |
| Squat stand / short rack | ~48″ wide × 20–48″ deep | Under 80″ workable | Fair — safeties often limited | Basements with ductwork; movable setups |
| CAP Barbell racks & attachments | Varies by model — cage, half rack, and stand options | Check the listed overall height per model | Model dependent; confirm safety bar spec | Budget-conscious builds and modular add-ons |
How to Choose
- Measure your lowest ceiling obstruction first. Not the ceiling — the garage door rail, the light fixture, the sprinkler head. You want roughly 8–10 inches of clearance above the pull-up bar to actually use it, and enough room to press a bar overhead if that’s in your program.
- Read the hole spacing, not just the height. Uprights with 2-inch hole spacing through the bench press zone let you set J-cups and safeties at a usable height. Wide 3- or 4-inch spacing means your safeties will sit either too high or too low on the bench, which defeats their purpose.
- Check the weight capacity honestly. A rack rated near 500 pounds is fine for someone squatting 225. If your five-year plan involves a 400-pound bar dropped onto safeties, buy steel rated well beyond your working weight — dynamic drop force is far higher than static load.
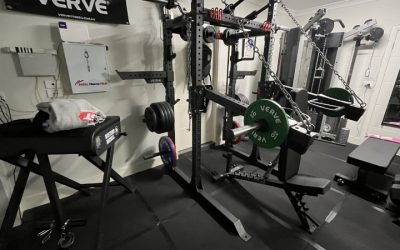
- Decide whether you’ll bolt it down. Half racks and squat stands are far more stable anchored to concrete. If you’re on a wood subfloor or renting, favor a four-post cage with a wide base and heavy weight-storage pegs at the rear, which counterbalance forward pull.
- Buy for the attachments you’ll actually add. Lat pulldown, dip handles, landmine, plate pegs, and a bar holder each need a compatible upright and hole diameter. Confirm the attachment fits your specific rack model before assuming the ecosystem is universal — hole sizes of 5/8″ and 1″ are not interchangeable.
Top Picks Reviewed
CAP Barbell Power Racks and Attachments
CAP occupies a specific and useful niche: it gets a functional rack into a garage for a fraction of what a commercial-grade unit costs. The line spans full cages with integrated pull-up bars, shorter half-rack and squat-stand configurations, and a set of bolt-on attachments — dip handles, plate storage pegs, landmine and bar-holder pieces, and lat/low-row options on select models. Because the range is broad, the single most important step is opening the specification section of the exact model you’re considering and writing down four numbers: overall height, base footprint, hole spacing, and rated capacity. Those four figures determine whether the rack fits your room and your lifts far more than the product name does.
In use, CAP racks are bolt-together construction, which means assembly quality is partly on you. Snug every fastener by hand, get all uprights plumb before final torque, then re-torque after the first week of lifting — bolt-together frames settle, and a re-torque removes most of the rattle people complain about. Set the rack on 3/4-inch rubber mats to protect the concrete and cut noise, and if the model allows anchoring, anchor it. Load the rear plate pegs with your heaviest pair for ballast. The honest expectation to set: this is a rack for progressive strength training in a home space, not a platform for repeatedly dumping heavy bars from height. Treat the safeties as a genuine backup rather than a routine landing zone, and lift within the rated capacity, and it does the job it’s priced to do.
Frequently Asked Questions
Can I bench press safely in a half rack?
Yes, if the spotter arms are rated for your working weight and adjustable in fine increments. Set them roughly an inch below your chest at the bottom of the press, then test with an empty bar before loading. The failure mode to avoid is arms set too high, which shortens your range, or too low, which pins the bar on your ribs.
Do I need to bolt my rack to the floor?
Full cages with a wide base and rear weight storage generally don’t require it for standard training. Two-post half racks and squat stands benefit substantially from anchoring, especially if you do heavy rack pulls or aggressive pull-ups. If drilling concrete isn’t an option, keep plates on the rear pegs and avoid high-force movements that pull the frame forward.
How much total floor space should I plan for?
Add roughly 3 feet on each side of the rack for a 7-foot barbell to clear, plus 3 feet behind for loading and walking. A practical minimum working zone is about 8 feet wide by 8 feet deep, and about 10 feet deep if you want to deadlift in front of the rack instead of inside it.
Are cheaper racks worth it, or should I save for a heavier one?
If you’re squatting under 250 pounds and want to start training this month, an entry-level rack that fits your space will produce more progress than a better rack you buy in a year. If you already lift heavy or plan to, spend once on thicker steel and tighter hole spacing — the upgrade path from a light rack usually means replacing it entirely, not improving it.
Final Thoughts
Pick the format your room allows, then pick the steel your lifts demand — in that order. A full cage is the better solo safety system when the ceiling cooperates; a half rack wins when it doesn’t, or when overhead work and open space matter more than four-post enclosure. CAP’s racks and attachments are a reasonable on-ramp for a first garage gym, provided you verify height, footprint, hole spacing, and capacity against your own tape measure and your own numbers on the bar. Bolt it correctly, re-torque it, mat the floor, and it will carry you through years of consistent training.
Write Your Review
No reviews yet. Be the first to share your experience!