Key takeaways
- Ignoring Voltage Compatibility: Never connect a low-voltage DC LED board directly to a 120V AC household line without an appropriate driver. Always buy a retrofit kit that explicitly states it operates on 120VAC or includes its own onboard driver.
- Overstuffing Wires: The space inside a ceiling fan light pan is incredibly tight. Make sure your wire connections are tucked neatly to the side and do not press directly against the hot LED diodes, which can melt the wire insulation over time.
- Buying the Wrong Size: Measure the interior diameter of your light pan before purchasing. A 5-inch board will not lay flat in a 4-inch pan, preventing you from reattaching the glass globe.
- Forgetting the Ground Wire: If your replacement kit includes a green or bare copper ground wire, make sure to secure it to the metal chassis of the ceiling fan to prevent shock hazards.
Integrated LED ceiling fans are incredibly efficient, but they come with a catch: unlike traditional fixtures, you cannot simply twist in a new light bulb when the light goes out. Instead, you must swap out the entire light-emitting diode (LED) module. If you are facing a dark room or a constantly flickering fixture, learning how to replace ceiling fan light kit led board components is a highly rewarding DIY project that can save you a $150 electrician bill.
However, rushing into this project without proper preparation can lead to serious issues. A poorly executed replacement can cause electrical shorts, melt the plastic housing, ruin your fan’s remote-control receiver, or even present a fire hazard. By following the correct safety protocols and matching the voltage and physical dimensions of your fixture, you can safely complete this upgrade in under an hour.
Our top picks

As an Amazon Associate we earn from qualifying purchases at no extra cost to you.
In 2026, modern retrofitting kits make this process easier than ever, offering magnetic mounts and adjustable color temperatures that fit perfectly inside standard 4-inch and 5-inch light pans.
What You Need
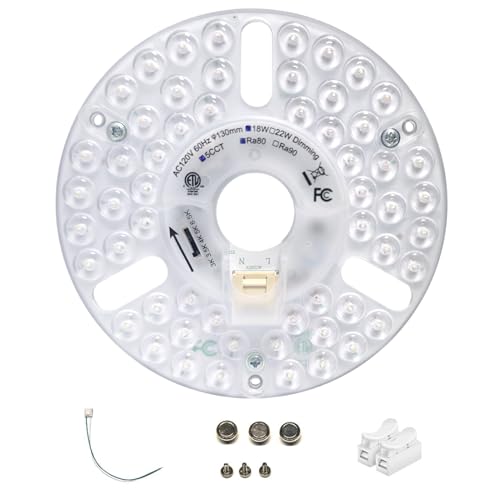
Before beginning, you will need a few basic hand tools and a compatible replacement LED board. Most standard ceiling fan light kits accommodate a circular retrofit board ranging from 4 to 5 inches in diameter with a wattage of 15W to 20W. Make sure to choose a replacement board that matches your home’s voltage (typically 120VAC in North America).
| Item | Why You Need It | Optional? |
|---|---|---|
| Replacement LED Board (e.g., 4″ 20W or 5″ 18W module) | The new light source. Choose a model with a built-in driver for 120V direct wiring. Cost ranges from $12 to $20. | No |
| Non-Contact Voltage Tester | To safely verify that the electricity to the fixture is completely turned off. | No |
| Screwdrivers (Phillips and Flathead) | To remove the light globe, light pan cover, and any mounting screws holding the old board. | No |
| Wire Strippers / Wire Cutters | To prep the fan wires if the original quick-connectors cannot be reused. | Yes (highly recommended) |
| Wire Nuts or Lever Connectors | To securely connect the new LED board wires to the ceiling fan’s power source. | No |
| Electrical Tape | To insulate wire connections and provide extra hold inside the tight light pan. | Yes |
Step-by-Step
Follow these steps carefully to safely replace your ceiling fan’s integrated LED board. Budget approximately 30 to 45 minutes for the entire process.
Step 1: Turn Off the Power (Time: 5 mins)
Safety is the absolute priority when working with electricity. Do not rely solely on your wall switch or remote control to turn off the light. Go to your home’s main breaker panel and switch off the circuit breaker that controls the ceiling fan. Once switched off, attempt to turn on the fan and light at the wall switch to verify there is no power. Finally, climb your ladder and use a non-contact voltage tester near the light kit to ensure the wires are completely dead.
Step 2: Remove the Glass Globe or Light Cover (Time: 5 mins)
Carefully remove the glass globe, shade, or plastic diffuser protecting the LED light kit. Depending on your fan model, this will either involve unscrewing three thumb screws on the collar of the light kit, or gently twisting the glass cover counterclockwise to unlock it from the keyhole slots. Set the glass cover aside in a safe place where it cannot fall or be stepped on.
Step 3: Remove the Old LED Board (Time: 10 mins)
With the light pan exposed, you will see the circular LED board secured to the metal base. Locate the wires feeding into the board. Most modern fans use quick-connect plastic clips, while older models may use wire nuts. Disconnect these wires. Next, remove the screws holding the old LED board to the metal pan. Carefully pull the old board away from the fan, taking note of how the hot (usually black or blue) and neutral (white) wires were routed.
Step 4: Prepare the New LED Retrofit Board (Time: 5 mins)
Unbox your new replacement LED board. Highly versatile retrofits, such as a 5-inch 18W multi-CCT kit or a 4-inch 20W high-output board, often feature built-in magnets on the back. If your fan’s light pan is steel, the magnets will hold the new board securely without any drilling. If the board features a color-correlated temperature (CCT) switch, select your preferred lighting warmth now (for example, a cozy 3000K warm white or a crisp 5000K daylight) before mounting the unit.
Step 5: Wire and Mount the New LED Board (Time: 15 mins)
Now it is time to make your electrical connections. Feed the fan’s supply wires through the center hole of the new LED board if necessary. Connect the neutral wire from the ceiling fan (white) to the neutral wire on the LED board (usually white or marked “N”). Connect the hot wire from the fan (blue or black) to the hot wire on the LED board (usually black or marked “L”). Use secure lever connectors or wire nuts to twist the bare copper ends together, wrapping them with electrical tape for added security. Once wired, press the magnetic backing of the board against the metal light pan, or align it with the original screw holes and tighten down the mounting screws.
Step 6: Test and Reassemble (Time: 5 mins)
Before putting the glass globe back on, restore power at the breaker panel to test your work. Turn on the wall switch. The new LED board should instantly illuminate without flickering. If it works perfectly, turn the wall switch back off, let the board cool for a moment, and carefully reinstall the glass shade or plastic cover. Your fan is now fully restored.
Mistakes to Avoid
- Ignoring Voltage Compatibility: Never connect a low-voltage DC LED board directly to a 120V AC household line without an appropriate driver. Always buy a retrofit kit that explicitly states it operates on 120VAC or includes its own onboard driver.
- Overstuffing Wires: The space inside a ceiling fan light pan is incredibly tight. Make sure your wire connections are tucked neatly to the side and do not press directly against the hot LED diodes, which can melt the wire insulation over time.
- Buying the Wrong Size: Measure the interior diameter of your light pan before purchasing. A 5-inch board will not lay flat in a 4-inch pan, preventing you from reattaching the glass globe.
- Forgetting the Ground Wire: If your replacement kit includes a green or bare copper ground wire, make sure to secure it to the metal chassis of the ceiling fan to prevent shock hazards.
How Often Should You Replace an LED Board?
Quality LED boards are rated to last anywhere from 30,000 to 50,000 hours. Under normal household usage (about 3 to 4 hours per day), a replacement board should easily last between 15 and 20 years. However, budget-grade LED drivers or fixtures subjected to frequent power surges may fail prematurely within 3 to 5 years. If your light dies early, it is usually the electronic driver component that has failed, rather than the light-emitting diodes themselves.
When to Call a Pro or Replace the Entire Fan
While swapping out a light board is a straightforward DIY task, there are times when you should walk away and call a professional. If you open the light pan and find scorched, brittle, or melted wires, this indicates a serious electrical fault that requires a licensed electrician to inspect. Additionally, if your ceiling fan is more than 15 years old, makes a loud humming or grinding noise, or wobbles severely, it is far more cost-effective to replace the entire ceiling fan rather than investing money into a new LED light kit.
FAQ
Can I replace an integrated LED board with a standard light bulb socket?
Generally, no. Integrated LED ceiling fans are designed without the depth or electrical sockets needed for medium-base (E26) or candelabra (E12) bulbs. Rewiring a fixture to accept standard bulb sockets is complicated, violates the fixture’s UL safety listing, and is rarely worth the effort compared to using a simple LED retrofit board.
What does “5CCT Adjustable” mean on a replacement kit?
A 5CCT (Correlated Color Temperature) adjustable kit features a small physical toggle switch on the circuit board. This switch allows you to choose between five different light colors—typically ranging from a warm 3000K (yellowish glow) to a cool 6000K (daylight blue)—so you can match the lighting ambiance of the rest of your room.
Why is my new LED board flickering after installation?
Flickering is almost always caused by compatibility issues with a wall dimmer switch. Older slide dimmers designed for incandescent bulbs do not supply the clean, low-wattage power that modern LEDs require. To resolve this, swap your wall switch for an LED-compatible dimmer, or ensure your replacement board is labeled as dimmable.
Can I use a magnetic mount LED board on an aluminum light pan?
No. Magnets will only stick to ferromagnetic metals like iron and steel. If your ceiling fan’s light pan is made of aluminum or plastic, the magnetic backing will not hold. In this case, you must use the provided mounting screws or high-temperature double-sided adhesive pads to secure the board in place.